Category Archives: Do It Yourself
Make Your Own BBQ Sauce

As summer begins to wind down and football season begins, I’ve had a hankering for some great BBQ wings. Since I live in the desert and it’s still around 95 degrees, I want something tangy, but not too spicy. I want something thick and sweet, but garlicky and balanced.
I have tried to make my own before, but it never came out as well as when I doctored an already made sauce. A few weeks ago, I rampaged my market’s BBQ section in search of something new to try. Surely there had to be a sauce I could use out of the bottle and didn’t have to put such effort into. Well, I didn’t find it.
Undeterred, I decided to make my own. I chose not to go first to the internet or any of my recipe books, sure that I could create something I may not have thought of if I followed some other recipe.
Armed with a bottle of ketchup, some minced garlic and whatever was in my pantry and fridge, I set out on my quest. I have to say I love what resulted. I hope you love it as much as I do. Who knows, maybe your doctoring of this sauce will give you something personal and perfect and you’ll stop reaching for those bottles at the grocery.
Ingredients:
1C Ketchup
2TBSP Honey
1/4C Brown Sugar
2tsp Key Lime Habanero Sauce
3/4tsp Chili Sauce
1tsp Smoked Paprika
1tsp Onion Powder
1TBSP Minced Garlic
1/4tsp Ground Mustard
1TBSP Liquid Smoke (Hickory flavor)
1TBSP Butter
1/8C Molasses
Salt & Pepper
Directions:
1. Put all ingredients directly into a saucepan and whisk to combine.
2. Heat first on low until everything is combined and warmed through. Continue whisking every 45 seconds or so to keep sauce from sticking or burning.
3. Turn heat to med/med-low and cook for about 6-8 minutes. Sauce will thicken slightly. You really just want everything to heat and meld and for the flavors to develop. You’re not reducing or really cooking, just heating and developing.
4. Taste the sauce at about 5 minutes. If you want to add heat or sweetness now is the time. Once you are satisfied with the flavor, turn to med-high and heat until sauce begins bubbling and caramelizing as shown below.
5. Now just sauce them! This sauce will cover about 15-20 small drumettes, or 10 regular size drumettes. ENJOY!!!


Making Home Made baby Food

When I had my son I knew I wanted to make my own baby food. I did start with store-bought food first so I could gauge what he liked. Luckily for me, the kid likes everything I feed him. Bananas, peaches, apples, sweet potatoes, carrots, peas, squash, he ate it all. The only thing he doesn’t like is the baby cereal. When I did get him yo eat the oatmeal and banana cereal it constipated him. So, no more of that. I will caution anyone buying store bought food that there is some great stuff and some not so great stuff. READ THE LABEL!!! I used the Gerber Natural food for my son. For many foods it had less than 3 or 4 ingredients and some only had 2, like the squash, made of squash and water. When visiting my parents, my mother set out to get some baby food for our arrival. She was momentarily caught up in the branding and wanted to get the Gerber Organic until I made her read the label. It included gelatin, tuna fish oil and other preservatives. Please read the label.
Once I was ready to start making his food I wanted to get a specific baby food processor. It’s not necessary, but a helpful tool. I asked a friend of mine, who has a son about 6 months older than mine, what she used and she sent me a link to the Baby Brezza. There are a few different types, but the one I bought is pictured above. It was $80, and I think I’ve about gotten my money’s worth.
The Baby Brezza is super easy to use and comes with a guide and recipe book in both English and Spanish. It is a built-in steamer and food pro all in one. Here’s how I use it:
1. Peel and chop your fruits or veggies as required.
2. Place in Baby Brezza food pro cup.
3. Fill steamer with water. Add some water to the food cup if necessary. (This makes a smoother purée for younger babies. )
4. Select desired steamer time (if steaming is necessary.)
5. Blend.
6. Store in container.
7. Feed the baby.
**Always be sure to read the steam times and all directions before using.


While you can easily lightly boil or steam and mash foods yourself, this tool makes it quick and easy to make your baby’s food. I have that baby that gets bored with any one activity after 10-15 minutes. I can peel and chop apples, banana, avocado, carrots, etc and toss them in the Brezza. The best part is I don’t have to be around while its steaming and blending. The timer takes care of it all and I can set just the steam timer, or the steam & blend timer so it does both. I like steaming because you don’t lose the nutrients like with boiling, and everything is still in the cup.
Be careful when it’s finished because the lid will be hot. I made an Apple-Cinnamon purée with Fig Jam. This was steamed for 20 minutes and I added about 1/4 cup of water to the apples before steaming. This made it pretty watery, but I wanted to add a banana to it after it blended. I’ll be posting the full recipe in the next day or so.

For storage, I use a couple different things. I have some small, glass canning jars with lids and some plastic food storage containers with lids. Both are about 4 oz containers.
I like the plastic because they’re easy to clean and you can use a dry erase marker to label directly on the side of the container whether its hot or cold. The metal lids in the glass jars are a little tougher to write on when cold, but I tend to not have to rewrite every time I grab the jar and forget not to grab the labeled side.


At the end of the day, this product enables me to make healthy food for my little guy, and know exactly what’s in it. It also allows me to experiment with different flavors I can’t find on the shelf, and tailor food precisely to his tastes. Something I didn’t mention was that there are plastic suction cups on the bottom of the Brezza and only 3 removable pieces (the lid, blade and cup). These pieces remove and rinse easily. That, a cutting board and a knife are all the tools you need to make great, homemade foot for your baby. What are you waiting for?

Do-It-Yourself Sweet or Salty Tortilla Chips

I love these chips because, like most of the foods I try to publish, they are super simple. I have seen so many people make variations of these, and I finally decided, I have to try them. I did, and they were wonderful! Make them any shape you like, dust them with any spice that suits you, but MAKE THEM. Here’s how I did it.
Ingredients:
- 6″ Corn Tortillas (Each tortilla makes 4 triangles)
- Oil for frying (I use peanut oil)
- Heat Oil to 360˚F. You can use a deep fryer, but I use a small pot with about 4 inches of oil.
- Slice tortillas vertically and horizontally, like slicing a pizza.
- Once the oil is hot, drop in the tortillas, 4 at a time. If using a pot, you may have to flip them. Watch for browning along the edges. It takes about 30 seconds per side. Remove them to a paper towel.
- While they are still hot, sprinkle them with your spice mixture. For nachos, or regular tortilla chips, I like to simply use kosher salt. For dessert nachos, I like using a salt and sugar mixture. You can sprinkle them by hand if using spices, or you can put your spice mix in a small paper sandwich bag. Drop in your chips and shake in the bag to coat.
- Remove them and set to the side. Repeat with each batch.
- Serve however you like. These are great with salsas, dips, spreads, you name it. They make great thick chips. Try them with cinnamon and sugar to make some awesome Dessert Nachos.


 With sugar and cinnamon. Mmmmmmmm.
Do-IT-Yourself Chicken Stock

Making your own stock or base always sounds like a daunting task. Since the first time I ever made my own chicken stock, I’ve worked in my circle of friends and family to promote making chicken stock at home. It’s so simple, why wouldn’t you? Now, to set the record straight, I still buy boxed stock. I have my favorite, and I usually use it when I run out and need it in an emergency, or to mix with my own when I’m using it in multiple recipes.
What’s the benefit to making your own? Well, pretty much the same as anything else you could make from scratch. First and foremost you can determine exactly what goes into it. You feel good about using it and not worrying about the sodium or fat content, because you’re controlling it. You can add as much or as little flavor as you want to! Not that any of your stock would lack in flavor, but say you’re an onion fan, a garlic fan, a mushroom fan… whatever the case may be you can give your stock that flavor. You can make it for specific recipes, too. Probably one of my favorite things about homemade stock is that it cleans out your veggie drawer. Hahaha. Oh, the possibilities. The next question, how do I make this Oh So Simple, Oh So Satisfying chicken stock? Here’s how I did it.
Ingredients:
- 1- 3-4 LB Chicken, innards removed
- 6 to 8 C Water
- 2 Carrots
- 2 Celery stalks, with leaves
- 4 Garlic Cloves
- 1 White or Yellow Onion
- 5 Button Mushrooms
- 1 TBSP Peppercorns
- ** You can add as much or as little of any of these as you like. For this particular batch, I also added a couple parsnips. Mostly because I had a bag of them that needed used.

Now, I know it seems like a lot of water, but I prefer to begin with a ton of water for 2 reasons. 1, it’ll cook down and you can cook it longer to get the most out of all the flavors you’re using. 2, It’ll cook the chicken, and when you’re finished, you’ll have a fully cooked chicken when all is said and done.
- Rinse chicken, remove any innards (heart, neck, liver, etc). Place in a deep stock pot and add water. I like to add enough water that it almost covers the chicken, but not quite. Once you add the veggies, the water will rise.
- Add veggies. You don’t have to peel anything as long as it’s clean. I still peel my onions, carrots and parsnips if they’re really dirty. otherwise, a rinse is fine. Just cut them in halves or quarters and toss them in the pot with the chicken.

- Boil for about 2 hours. Once it’s finished, you will notice it is the color of regular chicken broth. Taste it. It should have a rich chicken flavor.

- Strain the chicken and veggies into a bowl.

Now, you can use the veggies in another recipe, like a soup, and the chicken for anything you like.
- A lot of people let the stock cool. Then, they scrape off the fat layer from the top. I just put the whole thing in the fridge in a container. The next day, the fat will have risen to the top and hardened. It’s easier to remove this way in my opinion. You can now put it in the freezer for up to a month, or back into the fridge for up to a week.
- Discard the veggies or use them in a soup. They’re full of flavor and perfect for blending. As for the chicken, it will fall right off the bone. Use it in a soup, sandwich, or try my shredded BBQ Chicken Nachos recipe.


ENJOY!!!
Artisan Bread at Home

I follow several food blogs. Sadly, most of the time, I see things I would never make. Either I’m just not interested or I look at the ingredients and directions and say, “Ok, I’ll just have to take your word for it.” This morning I was up early. My AC is broken, ugh. Did I mention I live in the desert and it was 91 degrees today? So, at 6:30 AM, I woke up to 75 degrees, bright sunshine, and a slew of e-mails. One such e-mail was a new blog from http://littleoventhatcould.wordpress.com/2012/04/19/artisanbrea/. The blog features a too-good-to-be-true homemade artisan bread. It is quite literally the easiest bread with the fewest ingredients I’ve ever seen… and now, made. The original posting came from http://simplysogood.blogspot.ca/2010/03/crusty-bread.html, which is a pretty great food blog as well. Apparently it was taken from Le Creuset. All credit being given, I made two different loafs, both using almost the same ingredients, and both producing delicious results.
Ingredients:
3 C White Bread Flour
2 TBSP Kosher Salt
1/2 tsp yeast
2 C Water
Put the flour into a deep mixing bowl. Add salt and yeast and whisk. Add water and stir. You don’t want to use a mixer with a dough hook because this dough is WAY too sticky.


Once dough is mixed, it will be very sticky and lumpy. Cover the top with plastic wrap and allow it to sit in a warm place for 12 hours, or until it has risen and doubled in size.
Once your dough has risen, preheat your oven to 450 degrees F. Once it’s ready, put the lid on your Dutch oven and put it in the oven, empty, for 30 minutes.
Dump your bread out onto a heavily floured surface. I followed the advice of the other blog and used a flour sack towel. It made everything easier. Shape the dough into a ball without kneading it, and cover the dough with the plastic wrap again and allow it to rest.


Once the pot has been heated, remove the lid and carefully place the rested ball of dough inside. Flour your hands well prior to handling the dough. It makes things easier. You don’t need to
Put any oil or nonstick spray in the pot. The bread will lift straight out. Return the lid and bake for 30 minutes.

Tahdah! Okay, so I pulled this out about 7 minutes early. It smelled so good, I couldn’t help it. It was cooked all the way through, but, it didn’t fully get that deep golden brown color. I assure you, it tastes amazing!
Now, the other recipe is very similar and merely substitutes All-Purpose flour for the bread flour and uses 1 1/2 tsp salt and 1 1/2 C water. Use the same amount of yeast. Everything else is the same.
I will say this, look in on your bread on occasion. If you are familiar with bread baking, you’ll know when it’s risen enough. Now, like I said earlier, my AC is currently out, and it’s 80+ degrees in here. My dough was ready to go in about 8 hours.
Make this and ENJOY!
My second one turned out like so:

Fresh Garlic Tomato Sauce
I have recently been on a search for 2 things. The first is a way to use more of my fresh herbs. If you’re a regular follower, you’ll remember a little herb garden I started a few weeks ago. I’m happy to report that, so far, everything seems to be handling the heat well. Everything except my Greek Basil, which keeps drying on the edges. Bygones.
The second is a fresh, rich tomato sauce. I’ve tried before to make homemade sauce, and it never came out right. Well, I’ve finally figured it out. Turns out you don’t have to simmer it all day long and you can use canned tomatoes. The best part, this sauce is garlicky enough that lovers will be satisfied, but not so much so that you’ll reek of it. Here’s how to do it:
Ingredients:
1- 28 oz can crushed San Marzano tomatoes
2 TBSP Tomato Paste
2/3 C Dry Red Wine
Basil, Oregano, Italian Flat Leaf Parsley, Rosemary (I used fresh herbs. You can see how much below, but if you’re using dry herbs, you’ll want to use less)
5 cloves Garlic, minced
1 TBSP Balsamic Vinegar
Salt and pepper to taste
Extra Virgin Olive Oil for drizzling
Empty can of tomatoes into a pot and cook over medium heat. Stir in tomato paste. Add red wine and stir. Chop the herbs well and add them to the sauce along with the balsamic.
Simmer for at least 15 minutes, however, the longer you allow it to simmer, the more concentrated the flavors will become. I made the sauce, then, allowed it to simmer while I made the meat and pasta.
Serve with or without meat. Garnish with a sprinkle with your favorite cheese, a drizzle olive oil, and sprig of basil. You can also garnish with a dash of dry basil or balsamic.
Whether or not you add meat, this is a no fail sauce that will tickle your garlic fancy and make you seem like a rock star, and no one needs to know how simple it was. ENJOY!


Creamy Caramel Sauce

Almost everyone has a favorite recipe for caramel. Whether it’s a sauce, candy, filling or garnish, we all have our go to. I usually use my grandmother’s recipe when I make popcorn balls. Delicious!
With the discovery of the homemade fudge sauce I recently posted, and the addition of the doughnuts I made and posted the other day, I got experimenting.
After a few trial and error modifications, mostly error… okay, all error, I Decided to clean my pantry. I seem to find a plethora of energy when I’m frustrated. So, cleaning commenced and what did I find? A few bags of caramel bits!

Yay! It was so obvious. Here I am, screwing up batch after batch, trying to be original, when it was here all the time. I’ve already made desserts with melted pre made caramel bits and heavy cream. Why wouldn’t that make a goo drizzle or sauce? And it did.
1/2 C Caramel Bits
1/3 C Heavy Cream
1 tsp Vanilla Extract
Heat caramel bits and cream in a pot over medium heat. It’s easy to want to turn the heat to high, but you won’t get an even melt and you’ll have lumpy sauce.
Once everything is melted and combined, remove it from the heat, stir in the vanilla, and allow it to cool about 15 minutes. Test the consistency. It may still be slightly warm, but should be smooth, creamy and melty. It should not be starting to form clumps. If that is the case, it’s time to put it back on the heat and add more cream. If you think it’s too thin, like milk or even water, back to the heat and slowly melt in more caramel bits.
In no time at all you’ll have the quickest caramel sauce you’ve ever made, and it’s so yummy! Who knew?! Enjoy this on doughnuts, I’ve cream, brownies, the list goes on.


Herb Garden

My family is definitely a “try it and see what happens” kind of lot. When my brother wanted to put 3 ft stereo speakers in the back of his Toyota Corolla back in ’94, he started hooking up wires to see if it would work. Sadly, it did, but the entire car shook with the 2 subwoofers he had also attached.
My dad wanted to make a compost pile, so he did. He started tossing fruit and veggie leftovers in a pile of soil. Just a small bucket sized hole of dirt. Every few days he’d go out and flip the dirt around to mix in all the discarded stuff. One day, we noticed a vine coming out. It ended up being a cantaloupe. 2 came out of the compost pile, and they were the best tasting I’ve ever had!
Now, my grandmother is the green thumb in the family. Give her a dead seed and shell turn it into its own oasis. I, on the other hand, killed a cactus in a terrarium in 8th grade. But, I’ve been having a few successes here and there, and, I thought I’d try my hand at fresh herbs. Fresh herbs are so often shown on all the cooking shows these days. Everyone has a veggie garden and herb garden, etc. So I said, what the heck. Here’s what I did:


I got everything for this at home Depot. A bag of organic herb soil for like $6.50 or so, the rectangle planter box for about $15, and the plants were $2.50-$3.50 each.
I dumped a ton of soil, about 1/3 of the bag into the box, then dug out a little hole to set the plant in. Before you put the plant in, be sure to soak the roots well first.

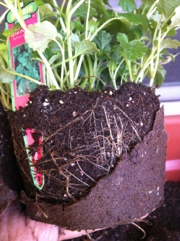


Now, my plants were in biodegradable containers. If this is the case, you can easily pull these from around the plant, tear them to pieces, toss them in the hole you made, mix with a little dirt and insert the plant. I did have a few that had already had roots in the container. No biggie, just rub your hand, with a little force, across the container until it crumbles away.
Once your plant is in the whole, cover it evenly with soil. Be sure not to crowd them too much. 3 to 4 in the boxes I have will give them plenty of room to grow.
I originally uses lemon balm, orange mint, Greek oregano, cilantro and chives. It was a bit crowded, so I went back to get another box and wound up buying a few strawberry plants, some sweet basil, Greek basil, peppermint, and chocolate mint.
Be sure to water your plants thoroughly when you’re finished. Check the soil daily and watch the weather. If its going to be a hot day, you may want to give them extra water. If you live in a dry climate, you should make sure
They have plenty of water and stay moist to damp. If all that seems to technical, just look at them. If the soil isn’t moist to the touch, water it. The water shouldn’t pool up and sit in the pot, though. That’s way too much. Just keep it simple. Start with one or two, and if they do well, get more! I went a little crazy, so we’ll see how they do. As long as I remember to water them, I should be ok. Hahaha. Enjoy!


Do It Yourself- Fudge Sauce
HOMEMADE FUDGE SAUCE

Do It Yourself Fudge Sauce
I have this game on my laptop called Chocolatier: Decadence By Design. (Yes, even my games often revolve around food and wine.) One aspect of the game is that you’re traveling around the world gathering ingredients so you can take them to a test kitchen and creating new products. At one point in the game, you get to make chocolate sauces. Well, it got me thinking, how would I even go about making a chocolate sauce? I’ve made berry sauces and wine sauces and gravies, but, surely, it can’t be that simple, can it?
I checked out several recipes for homemade fudge sauce, added my own twist, and came up with this super smooth, creamy and fudgey sauce that will have you making it for yourself and bottling it for your friends. It’s that quick and that easy! The best part is, you probably have everything you need in your pantry.
Try this sauce on strawberries, between cake layers, on ice cream, drizzled over doughnuts, in coffee, or in any of those, cravingly unhealthy ways we sometimes do, like with salt & vinegar chips or cheddar cheese cubes.
Let’s get started!
Ingredients:
- 1 C Milk
- 1 C Sugar (plain, white)
- 1/3 C Cocoa Powder
- 2 TBSP Flour
- 2 TBSP Butter
- 1 TBSP Vanilla
- 1 TBSP Instant Coffee (gives a whole new depth to the chocolate flavor)
- Pinch Table Salt
Mix everything, except the vanilla, together in a small pot or saucepan. Heat on med-high until boiling, stirring continually. Once it boils, turn down to medium and continue stirring until it thickens. Once it reaches that fudge sauce consistency and begins to thicken and coat a spoon, about 3-5 minutes, turn off the heat and stir in the vanilla.
All done! Use it immediately or allow it to cool slightly and store it in an airtight container in the fridge. A great thing about this sauce is that it only takes about 15 minutes, so you can whip it up easily before your craving goes away. It also makes the perfect amount so that you’re not burdened to use tons of it right away. You can use a tablespoon or two, and put it back in the fridge. It keeps really well for weeks in the fridge.
I hope you love this recipe. I know as I was making it, I kept smelling it and stirring it and watching it thicken up, and once I tasted it I knew I would never buy fudge sauce from the grocery again!
